
Building a Local Smart Home Hub: Unifying HRV and Air Quality
I’ve just wrapped up a project that brings together a NovingAIR PHANTOM Wireless 160 heat recovery ventilation (HRV) unit and an 8-in-1 air quality monitor into one local smart home control system.
The idea is simple: monitor indoor air quality in real time and automatically control ventilation speed to keep the space healthy, all from a custom mobile dashboard.
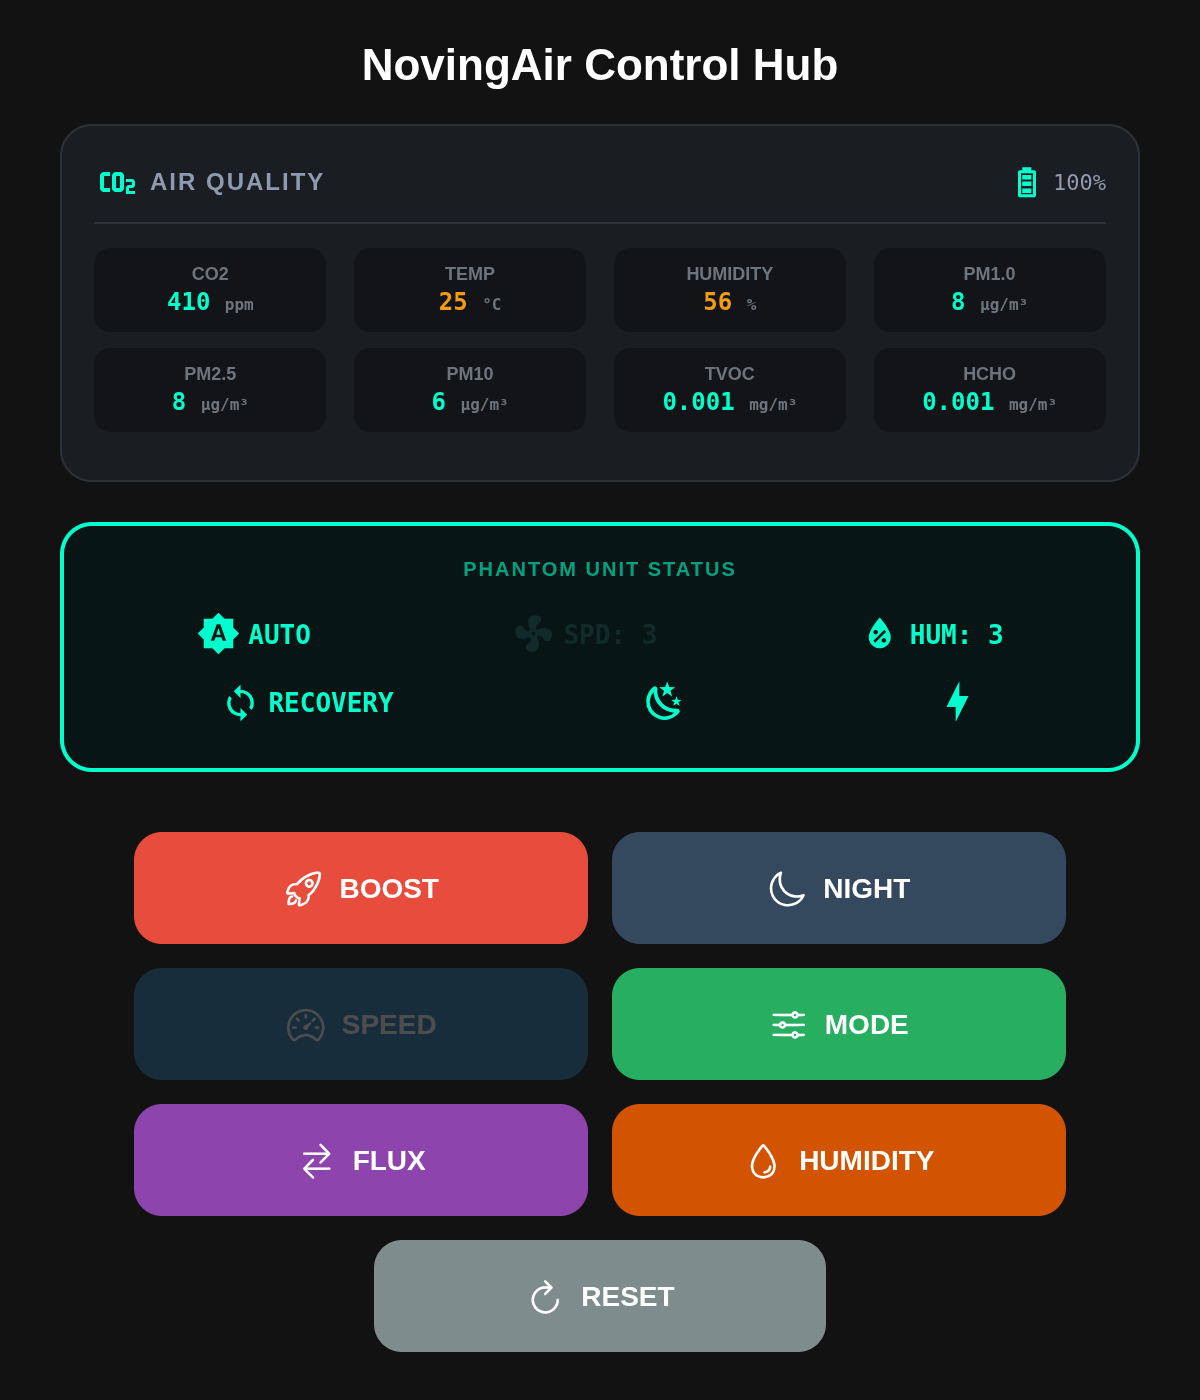 My responsive React Native dashboard visualizing live sensor telemetry and manual control overrides.
Why I built it
It started with a common problem: waking up in a stuffy bedroom. I had a standalone NovingAIR PHANTOM unit and a Tuya 8-in-1 Air Quality Monitor, but they didn’t talk to each other. The HRV was essentially “dumb,” relying on manual remote control adjustments, while the air monitor just passively collected data.
I wanted a system that was small enough to run locally without cloud latency, but robust enough to automate my environment based on real-world health metrics.
This evolved into a full-stack local network project. The goal was to build a unified backend that could poll telemetry data, evaluate it against health thresholds, and automatically fire infrared commands to the HRV via a Phantom IR Blaster.
The Hardware and Architecture
The project relies on two main pieces of hardware operating on my local network:
- 8-in-1 Air Quality Monitor: A Tuya-based sensor (Protocol 3.5) reporting CO2, temperature, humidity, PM1.0, PM2.5, PM10, TVOC, and HCHO.
- Phantom IR Blaster: Another Tuya device (Protocol 3.3) capable of sending infrared signals to the NovingAIR unit.
To orchestrate everything, I split the architecture into two layers:
- The Backend (FastAPI): A Python server handling continuous background polling of the sensors, managing state, and executing automation loops.
- The Frontend (React Native/Expo): A cross-platform mobile application providing a sleek UI to view live data and manually override HRV modes.
The Power of Automation
The real magic of this setup is the automated hysteresis loop. I now have the ability to measure key metrics, dynamically change fan speeds, and toggle modes based on specific environmental thresholds.
Instead of waking up to adjust the fan manually, the FastAPI server continuously evaluates the air quality. I built the automation around standard indoor air health thresholds:
| Metric | Good | Moderate | Unhealthy |
|---|---|---|---|
| CO2 | <800 ppm | 800-1200 | >1200 |
| Temp | 18-24°C | 15-28°C | <15 or >28 |
| Humidity | 30-50% | 25-60% | <25 or >60% |
| PM1.0 | <12 µg/m³ | 12-35 | 35-55 | >55 |
| PM2.5 | <12 µg/m³ | 12-35 | 35-55 | >55 |
| PM10 | <12 µg/m³ | 12-35 | 35-55 | >55 |
| TVOC | <0.3 mg/m³ | 0.3-1.0 | >1.0 |
| HCHO | <0.05 mg/m³ | 0.05-0.1 | >0.1 |
The Sleep-Friendly Hysteresis Loop
At first, I set the automation to trigger at 1200 ppm CO2 and recover at 800 ppm. However, I quickly realized that forcing the HRV into “Speed 3” or “Boost” mode overnight was too noisy for a bedroom environment.
To solve that problem, I adjusted the automation to prioritize uninterrupted sleep while still preventing the air from becoming stale. I implemented a quieter recovery loop:
# TRIGGER OVERRIDE: CO2 > 1200 (Unhealthy CO2)
if co2 > 1200 and not co2_override_active:
    print(f"[AUTOMATION] CO2 high ({co2} ppm). Forcing quiet MANUAL Speed 2.")
    co2_override_active = True

    # 1. Switch to MANUAL
    CURRENT_STATE["mode"] = "MANUAL"
    if "MODE_MANUAL" in BUTTON_CODES:
        ir_device.send_button(BUTTON_CODES["MODE_MANUAL"])

    await asyncio.sleep(1.5)

    # 2. Switch to SPEED 2 (Balanced noise and airflow)
    CURRENT_STATE["speed"] = 2
    if "SPEED_2" in BUTTON_CODES:
        ir_device.send_button(BUTTON_CODES["SPEED_2"])

    save_state(CURRENT_STATE)

# RECOVER OVERRIDE: CO2 < 800 (Good CO2)
elif co2 < 800 and co2_override_active:
    print(f"[AUTOMATION] CO2 normalized ({co2} ppm). Restoring AUTO mode.")
    co2_override_active = False

    # 1. Switch to MANUAL
    CURRENT_STATE["mode"] = "MANUAL"
    if "MODE_MANUAL" in BUTTON_CODES:
        ir_device.send_button(BUTTON_CODES["MODE_MANUAL"])

    await asyncio.sleep(1.5)

    # 2. Switch to SPEED 1 (Balanced noise and airflow)
    CURRENT_STATE["speed"] = 1
    if "SPEED_1" in BUTTON_CODES:
        ir_device.send_button(BUTTON_CODES["SPEED_1"])

    save_state(CURRENT_STATE)
This logic ensures the system doesn’t rapidly cycle on and off (thanks to the 400 ppm gap) and keeps the fan at a tolerable volume (Speed 2) throughout the night.
Overcoming Frontend Hurdles
Building the frontend wasn’t without its quirks. I chose Expo and React Native to get up and running quickly on an Android device.
Along the way, I had to navigate a few classic mobile development hurdles:
- Missing Assets: Resolving startup crashes by cleaning up outdated
app.jsonconfigurations. - Network Binding: Ensuring the mobile app fetched from the host PC’s network IP rather than
localhost(which would loop back to the phone itself). - Dependency Hell: Navigating strict peer-dependency lockouts with React 19 and aligning the local project’s Expo SDK (v57) with the installed Expo Go app on the physical device.
Running a few well-placed --legacy-peer-deps flags and side-loading the latest Expo Go APK directly from the web helped me bypass the Google Play Store delays and get the Metro Bundler humming perfectly.
Conclusion
This project has been an incredibly satisfying mix of reverse-engineering IoT protocols, writing asynchronous Python, and tuning React Native UI components.
I now have a completely localized, self-contained hub that runs 24/7 on an Ubuntu machine. Even if the display goes to sleep, the background asyncio tasks keep polling and adjusting the ventilation to keep my air fresh and my sleep quiet.
It’s a perfect reminder of how powerful home automation can be when you take control of your own data and hardware.
